If you don’t want your Deadlock to be dead meat, it's time to put in some practice. Valorant’s new agent is a Sentinel with a wealth of gadgets and an ultimate that's near-guaranteed to get you a kill – provided you know how to use it. If you’re new to Deadlock, we’re here to help. Our Deadlock tips and tricks for beginners will walk you through each of her abilities to help you secure sites, steal kills, and lock down the victory.
Valorant Deadlock tips and tricks for beginners

© Riot
To get your Norwegian agent know-how up to scratch, we’ve tailored our tips to each of Deadlock’s abilities. (We’ve also got an extensive breakdown of her abilities here if you need it.). We’ve followed that up with some general tips on how to play Deadlock in Valorant.
Barrier Mesh
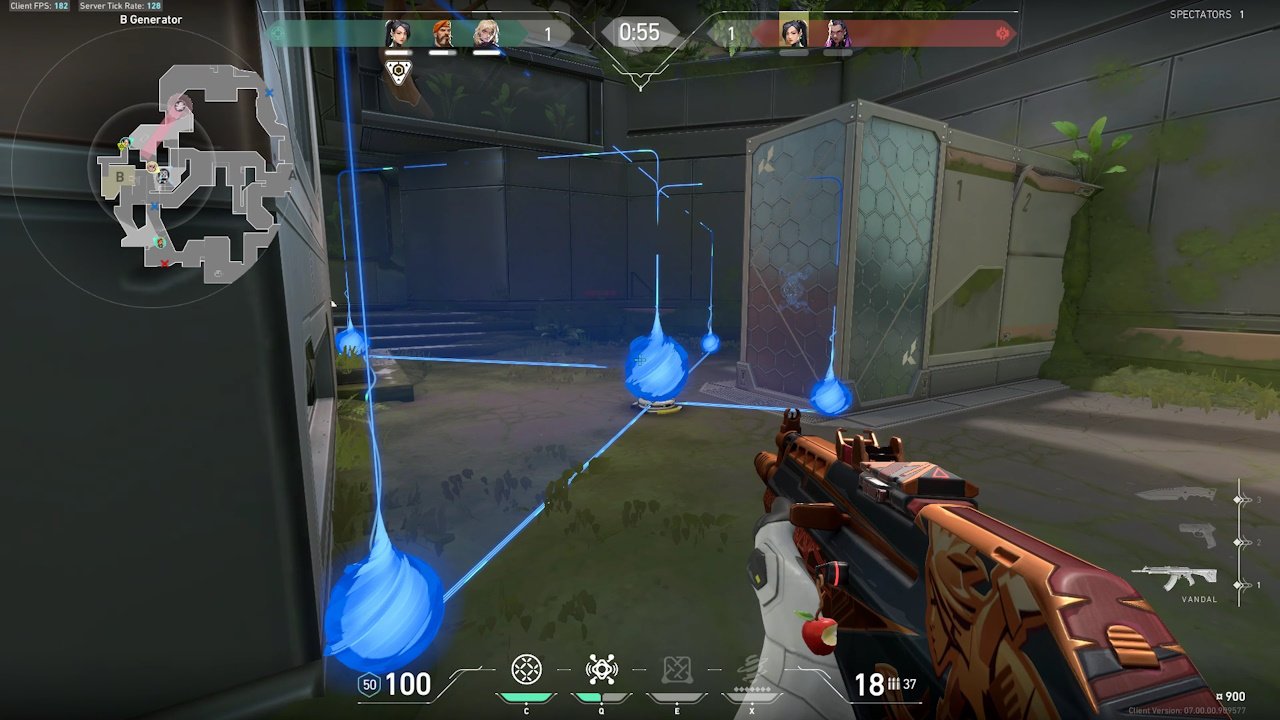
Deadlock’s signature ability equips a barrier mesh she can throw down to spawn four walls which block movement but not sight, gunfire, or many abilities. The walls last 30 seconds from activation and can be destroyed by shooting the side or central orbs at the base of the walls. With high health for all orbs, this ability is especially powerful in the pistol round, so make sure you deploy it where you know opponents are heading to maximize its value.
Don’t try to finesse the positioning: If you try to align Barrier Mesh such that no orbs will be visible when blocking a narrow corridor exit, the ability won’t spawn as you’d expect. The barriers adjust alignment based on their surroundings, so don’t try to get too fancy with where you place it. Getting it down in a tight passageway is more important than wasting minutes of a round chasing a perfect alignment that doesn’t exist.
Watch the windup: Much like Sage’s wall, Barrier Mesh deploys with reduced health for the first second and a half. As such, it’s rarely ideal to throw directly in the path of large numbers of opponents who can quickly gun it down. On defense, use it against individual enemies or in chokepoints you know the enemy team is approaching. Alternatively, save it in order to….
© Riot
Guard the spike: If the spike is planted or dropped close to a wall, Barrier Mesh is an infuriating extra hurdle to cope with when the clock is ticking down. Unlike Sage’s wall, it can be thrown down rapidly without much care for alignment. Be sure to utilize it post-plant on attack or when you catch out the carrier unexpectedly on defense. Placing the Barrier mesh directly on top of a downed spike will even stop Omen from teleporting to it using his ultimate.
Know your counters: Barrier Mesh will block most Agent movement, but not all. Omen can Shadow Step to teleport directly through the barrier. Reyna’s Dismiss allows her to travel through the barriers as well, though this may be a bug. Jett and Raze can launch themselves over the wall. Sage can spawn an ice wall within it to lift her or others over with a little jump. Yoru’s ultimate allows him to walk through the barriers freely.
In addition, some abilities will deal heavy direct damage to barriers. Skye’s ultimate and Fade’s prowlers, for example, will degrade barriers rapidly when attempting to hunt a target through them. Most ground-based abilities – including Gecko’s Wingman, Skye’s dog, and Yoru’s TP – won’t be able to pass through, however.

© Riot
Get creative: Barrier Mesh doesn’t have to be a defensive tool. Know an opponent wants to fall back from a position? Throw the barrier over their head to trap them in with no hope of escape. Situational? Certainly. But you’ll feel like a genius when you pull it off.
GravNet
One GravNet grenade can be purchased each round. When thrown, it detonates on impact with the ground. This creates a circle, forcing any impacted players to crouch for six seconds. Those affected can hold interact (F by default) to remove the effect or use movement abilities like Jett’s Tailwind dash or Yoru’s teleport to escape the radius and its effects.
It’s consistent with other agents: The throw range for GravNet matches other thrown Agent abilities like Viper’s toxic orb, Kay/O’s frag grenade, and Killjoy’s nanoswarms. Already learned some lineups? They’ll work for Deadlock too.
Only the detonation matters: While GravNet spawns a circle on the ground after impact, it's only the inital explosion that matters. If the first explosion doesn't hit, players walking into the circle won't be affected. In short, make sure you hit your targets.
Work with your teammate: GravNet is best used in combination with another Agent’s damaging ability. Pair it with Raze’s grenades, Brim’s molly, Viper’s snakebite, Gecko’s mosh pit, or Astra’s Gravity Well/Nova Pulse for maximum impact.

© Riot
Catch their exits: On offense, GravNet is a great tool for hindering Opponents looking to fall back after an initial gunfight, forcing them to stay in place or move very slowly.
On defense, it can completely shut down an aggressive burst. If you think the other team is about to make a play, bounce it into their path from safety or through a smoke to lock them down and halt their progress. That’ll give you plenty of time to get Deadlock’s Barrier Mesh in place as well if needed.
Sound Sensor
Deadlock can purchase two sound sensors each round which can be placed on nearby walls and will remain active at all ranges. They turn invisible after a second’s delay but, unlike most traps, Sound Sensors don’t trigger based on vision or distance. Instead, they activate when anyone makes enough noise within the detection range (shown while placing). This gives them a distinct purpose compared to other trip wires.

© Riot
Place them under drops: Because Sound Sensor doesn’t trigger against walking opponents, it’s far less useful than something like Cypher’s tripwire when it come to covering your flank. Instead, you want to position it in places that you know opponents will make noise. A great choice is at an enforced drop like onto Ascent’s B-Site from lane or Fracture’s A-Site from dish. When they make the jump, they’ll immediately be concussed and open for punishment.
Or at choke point exits: Alternatively, focus on areas that opponents are likely to take fights or use abilities to burst out from. Typically, these will be the entrance points to sites. When the opposing team makes their move, they’ll trigger the Sound Sensor, letting you spring from cover and strike. Sound sensors can be seen an heard by enemies that approach closely enough, so position them a little away from openings but such that the effect zone still covers them.
For this reason, Sound Sensors are best saved on the attacking half for after you’ve planted the Spike. If you place them to cover your team’s back, they’ll likely miss anyone sneaking up from behind.

© Riot
Or to cover the spike plant/defuse: Sound Sensor is also a great plant or defuse detector when your team’s numbers are running low. Leave the trap near to but not directly next to a plant spot and it’ll be tripped as soon as someone begins to plant or starts defusing. In the latter case, you’ll usually be near enough to take them out while concussed.
You can stick them on any near-vertical surface: Sound Sensors can’t be placed on the floor or ceiling, but that doesn’t mean walls are your only options. You can hide them on small steps like the ones shown below on Ascent’s B site. Get creative and don’t just place them in the same spot each round.

© Riot
Annihilation
When activated, Deadlock’s ultimate gives her ten second to aim and fire a cylindrical beam which captures the first opponent hit. The targeting beam bounces once off surfaces within range before ending in a wider, dome-shaped capture zone.
The first enemy encountered will be wrapped in a cocoon and slowly moved back along the capture path before being instantly killed at the end. The cocoon can be destroyed by the captured player’s allies to release them.
Isolate your targets: Annihilation is best used against solo site defenders or isolated targets who have no one to help free them. If you know an opponent has been holding a position like Bind’s B-Site Gardens solo, you can open the round with Annihilation to secure an easy first kill without even starting a gunfight.
Annihilation is also immensely powerful in low-number situations. If you’re in a 2v2, hitting one player with it will force the other to fight alone or risk themself to free their partner. Either use it early in a round to gain the advantage or save it until there are fewer players left to break the cocoon.

© Riot
Get creative with angles: Annihilation’s path can be bounced off ceiling and angled surfaces to reach unexpected places. Use this to capture opponents who can’t see you and assume that they’re safe. This is especially important when defending the planted spike. Figure out angle that’ll drop the capture zone right on top of anyone who tries to defuse, while keep you safely tucked in cover.
If you bounce the beam off a high ceiling like in Icebox’s A Site or Fracture’s B Site, the trapped player will be hauled up into the air. If high enough, they’ll die from fall damage when released, assuming they’re not Jett or a quick-thinking Raze with blast satchels.

© Riot
Utilize its range: Provided it doesn’t hit two walls, Annihilation’s max range will travel almost the full length of Haven’s C Site corridor. That makes it possible to pick off enemies at great distance. Conveniently, the ending dome can also catch people half hidden behind objects like the box on Haven’t C Site.
The further away you capture an enemy, the faster their cocoon will travel. Use the length and bounces to catch enemies who think they’re safely hidden away at the back of a site, pulling them quickly away from any allies.
Know that it can be dodged/countered: There’s a brief windup time to the capture. If used at close range, targets can escape capture by running sideways quickly and out of the cylinder. As such, Annihilation is less effective at very close ranges. Yoru can also spawn a decoy to be captured by the ult instead of a real player.

© Riot
The path matters: Annihilation will attempt to pull players along the path it was fired from, but this won’t always be possible. If the beam was fired along a route players can’t path, the cocoon will get stuck and fail after a delay. This can also be triggered proactively by a Sage blocking the path with her wall. If you capture an enemy in this manner, make sure you’re ready to take them out when they get released.
It continues even if you die: Annihilation’s cocoon won’t be canceled if Deadlock dies while it’s active, so you don’t need to play safely after securing an enemy. This also mean that on attack and with the Spike planted you could feasibly win the round by capturing an enemy as they kill you. Even with no one alive, the cocoon will still carry the final player to their death, denying them the chance to defuse.
Pair your in-game equipment with great gaming gear

© HyperX
If you're reading this guide, you're probably keen to get every advantage you can in Valorant. So while you're learning to use Deadlock's kit, why not improve your gaming gear as well? The angled drivers of the HyperX Cloud III headset will turn your ears into a personal sound sensor, letting you better identify your opponents' locations and eliminate surprise backstabs. And when it's time to hit the firing range, a ultra-lightweight mouse like the Pulsefire Haste 2 will help you hit those flicks with ease thanks to the precise sensors packed into its 53g frame.
General Deadlock tips
You’re invaluable on pistol rounds: At the time of release, Deadlock’s Barrier Mesh has a massive health pool, making it seriously tough to take down with pistols. It’s best employed cutting off a chokepoint or covering a planted spike, so don’t risk your life early taking unnecessary pistol duels before you can put it to purpose.
Don’t blow all your gear early: Deadlock’s signature barrier is extremely powerful, but it also lasts less time than Sage’s wall. As such, it isn’t something you should throw down at the start of every round on defense. Instead, try to be reactive or proactive with your kit. Use it to lock off one direction while you push another or cut down your opponent’s entry points right as they’re setting up to push. Managed to down the spike as a defender? Your barrier is the perfect tool to cut the rest of the attackers off from it.

© Valorant
As an attacker, follow, don’t lead: Besides her GravNet nade and ultimate, Deadlock has very little utility for gaining ground and clearing space. Where she excels is in late-round scenarios with fewer players left alive. We’re not saying you should avoid fighting entirely, but you should let your teammates lead the charge so you can clutch up later in the round.
Open or end rounds with your ultimate: Annihilation is extremely powerful, but only in certain situations. It can be used as a round opener to catch an isolated defender out or briefly shift numbers in your favor. Otherwise, save it until there are only a few players left on each side, where one being cocooned will swing things heavily in your favor.
Keep an eye on your enemy’s kit: Your barrier is particularly vulnerable to Fade’s prowler when hunting and Skye’s seekers. If you’re facing either of these agents with their ultimates, consider saving your barrier until you know it won’t be blitzed down by them.
Those are all the Valorant Deadlock tips and tricks for beginners we’ve got. Keep them in mind and before long you’ll be annihilating the opposition with far more than just her Ultimate.